Nude photography techniques
Easy nude photography techniques can easily move your photos through the average towards desirable.
Before I begin I just needed to re-iterate my thoughts the subject.
 Nude photography is surely an ancient art form.
Artists have been painting nudes because the dawn of energy and photographers are already doing exactly the same since cameras came to be.
I completely recognize that some photographers stay away though, fearing their photography will lumped jointly that regarding a distasteful nature.
That is certainly all right.
I wouldn't want that you feel uncomfortable about nude photography if you decide to think you could be offended please utilize the links over the rest these pages to explore the most my site.
If you are content to gather more information and learn some nude photography techniques then please keep reading.
Shooting angles
One of several simplest nude photography strategies to make full use of would be the shooting angle. Finding a good shooting angle can produce a massive difference to successful nude photography - promoted can make or break a photo.
High shooting angles
 In case you go for the ordinary face-on photos you are very likely to with flat boring photos, or even worse the sort of photo that you will find familiar to readers of cheap tabloid newspapers.
The human being form can be looked at from numerous angles if you explore these angles you'll discover your nude photos improve a massive array.
Here is another high shooting angle. This is an easy technique to use and many types of you may need is usually a ladder or a chair; jump a few steps (or climb onto a chair) and photograph your model from above.
If you wish the model's face along with their body inside photo cause them to become look up to the camera - it has the additional advantage of reducing any sagging with the neck and face.
Low shooting angles
Another easy nude photography strategy is to accomplish the opposite - get one of these low shooting angle. Taking photos from the bottom up can again give nude photography more impact but a little more thought in positioning your model may very well be needed.
 By shooting from a low angle you'll need to try taking some more care to make certain your photography keeps for the right side of good taste.
Careful positioning of one's model's legs can maintain their modesty, as can a carefully placed prop.
In case your aim should be to include a number of the more personal aspects of the human beings form you'll be able to clearly vacation with being less careful using your positioning.
The photo here runs on the low shooting angle which gives an interesting shot.
To accomplish this you should either position your model onto an item so they really are elevated, or perhaps you need to get on the floor yourself and photograph upwards.
In the event you select the lying on the floor method you may still should position your model on something to supply them slightly height, however , you are able to break free with a small box or possibly stack of books.
The photo here's an example obtained from a fab little nude photo eBook and neatly shows over the-down shooting technique.
Unusual shooting angles
Everywhere shooting angles can perform much for nude photography. But when you have got used to moving yourself around your model begin to obtain additional creative.
Another simple nude photography technique is to attempt extra unusual shooting angles - sideways on, feet first, 45 degree angles . . . there are many possibilities.
The key is to maintain moving you guessed it-your camera and experiment. A fantastic tip is to buy your model to face still and take 8-12 photos all from unique angles.

Doing this will not merely ensure you get thinking more creatively about your shooting angle but may well open an angle that is pleasing and worth further shots.
The photo above explores what can be performed having a side on angle. You will find there's whole section specialized in shooting angles, not to mention another 49 chapters on nude photography techniques, in this particular sensational nude photography eBook.
Focal lengths
While using the right focal distance will bring an authentic sense of quality to nude photography.
Utilizing a focal distance in excess of 50mm means (to put it differently, a telephoto lens) is wonderful for portraits. A focal length close to 70mm is ideal for the classic head and shoulders portrait because doing so doesn't distort the topic.
Furthermore , it gets the advantage of making noses appear a bit less long and chins slightly less pronounced - generally considered desirable traits within a portrait.
In case you have a the len's zoom it in near to your subject and you may see the reason.
Alternatively, anything below 50mm (wide angles) will usually distort your subject.
In nude photography, in which the rules of normal portrait photography is usually comfortably broken, this could create an appealing look.
Have a look at the photo here. A diverse angle lens was chosen and it also distorts the whole picture building a dramatic work. Combine this by having an interesting shooting angle and you've got a fantastic shot.
Rule of thirds for nudes
The rule of thirds can function well for most kinds of photography, therefore it may work effectively for nudes too.
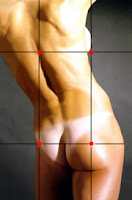
Principle premise from the rule of thirds is usually that the regions of the style that should attract the viewers' interest are placed on imaginary 'thirds' drawn across an image - a lot like overlaying a tic-tac-toe grid over a photo.
Look into the photo here and you'll see what I mean.
Key top features of the nude fall of that tic-tac-toe grid. But there's more into it than this.
Have another think about the photo here and you should see I've added red dots. These dots have reached the points where the vertical and horizontal lines cross.
These are the real hot-spots of any photo, plus nude photography these are the points in which you should place your primary points of focus.
Applying this technique is a simple way to make sure half-decent results most likely. You will discover course other techniques that will be easily learn that may get superb shots quite often.
You will need time for you to learn these more complex techniques, but when you have a not much time and also take your nude photography further this amazing downloadable package offers you everything you need to know.
Use diagonal lines of composition
Another photography technique that work well well for nearly all types of photography is the by using diagonal lines within your compositions.
nude photography techniques - rule of thirds Using diagonal lines can really make a photo more punchy. It adds another portion of drama and impact on the image.
Inside photo here the model was positioned in order to develop a diagonal along the photo.
This creates an infinitely more dramatic shot than simply positioning the model prone.
Diagonals don't simply have to be produced by placing your model in a very diagonal. You might also use props within the scene to create the diagonal, as well as tilt the digital camera to create a distinct diagonal.
Breaking the rules
The foundations here will certainly buy your nude photos off the ground and may allow you to get half decent photos.
When you've established basic fundamentals and are ready to go it might be time and energy to break among those rules and in some cases add in extra dimensions.
For example, make use of lighting techniques to create shadows that fall as diagonals. You might play with horizontals and verticals. There's an abundance of ideas within this fabulous nude photography eBook.
Furthermore , it is sold with free audio lessons along with a helpful video should you wish to earn money from your photos. These bonuses alone make the package an outstanding investment in nude photography.

Before I begin I just needed to re-iterate my thoughts the subject.
Artists have been painting nudes because the dawn of energy and photographers are already doing exactly the same since cameras came to be.
I completely recognize that some photographers stay away though, fearing their photography will lumped jointly that regarding a distasteful nature.
That is certainly all right.
I wouldn't want that you feel uncomfortable about nude photography if you decide to think you could be offended please utilize the links over the rest these pages to explore the most my site.
If you are content to gather more information and learn some nude photography techniques then please keep reading.
Shooting angles
One of several simplest nude photography strategies to make full use of would be the shooting angle. Finding a good shooting angle can produce a massive difference to successful nude photography - promoted can make or break a photo.
High shooting angles
The human being form can be looked at from numerous angles if you explore these angles you'll discover your nude photos improve a massive array.
Here is another high shooting angle. This is an easy technique to use and many types of you may need is usually a ladder or a chair; jump a few steps (or climb onto a chair) and photograph your model from above.
If you wish the model's face along with their body inside photo cause them to become look up to the camera - it has the additional advantage of reducing any sagging with the neck and face.
Low shooting angles
Another easy nude photography strategy is to accomplish the opposite - get one of these low shooting angle. Taking photos from the bottom up can again give nude photography more impact but a little more thought in positioning your model may very well be needed.
Careful positioning of one's model's legs can maintain their modesty, as can a carefully placed prop.
In case your aim should be to include a number of the more personal aspects of the human beings form you'll be able to clearly vacation with being less careful using your positioning.
The photo here runs on the low shooting angle which gives an interesting shot.
To accomplish this you should either position your model onto an item so they really are elevated, or perhaps you need to get on the floor yourself and photograph upwards.
In the event you select the lying on the floor method you may still should position your model on something to supply them slightly height, however , you are able to break free with a small box or possibly stack of books.
The photo here's an example obtained from a fab little nude photo eBook and neatly shows over the-down shooting technique.
Unusual shooting angles
Everywhere shooting angles can perform much for nude photography. But when you have got used to moving yourself around your model begin to obtain additional creative.
Another simple nude photography technique is to attempt extra unusual shooting angles - sideways on, feet first, 45 degree angles . . . there are many possibilities.
The key is to maintain moving you guessed it-your camera and experiment. A fantastic tip is to buy your model to face still and take 8-12 photos all from unique angles.
Doing this will not merely ensure you get thinking more creatively about your shooting angle but may well open an angle that is pleasing and worth further shots.
The photo above explores what can be performed having a side on angle. You will find there's whole section specialized in shooting angles, not to mention another 49 chapters on nude photography techniques, in this particular sensational nude photography eBook.
Focal lengths
While using the right focal distance will bring an authentic sense of quality to nude photography.
Utilizing a focal distance in excess of 50mm means (to put it differently, a telephoto lens) is wonderful for portraits. A focal length close to 70mm is ideal for the classic head and shoulders portrait because doing so doesn't distort the topic.
Furthermore , it gets the advantage of making noses appear a bit less long and chins slightly less pronounced - generally considered desirable traits within a portrait.
In case you have a the len's zoom it in near to your subject and you may see the reason.
Alternatively, anything below 50mm (wide angles) will usually distort your subject.
In nude photography, in which the rules of normal portrait photography is usually comfortably broken, this could create an appealing look.
Have a look at the photo here. A diverse angle lens was chosen and it also distorts the whole picture building a dramatic work. Combine this by having an interesting shooting angle and you've got a fantastic shot.
Rule of thirds for nudes
The rule of thirds can function well for most kinds of photography, therefore it may work effectively for nudes too.
Principle premise from the rule of thirds is usually that the regions of the style that should attract the viewers' interest are placed on imaginary 'thirds' drawn across an image - a lot like overlaying a tic-tac-toe grid over a photo.
Look into the photo here and you'll see what I mean.
Key top features of the nude fall of that tic-tac-toe grid. But there's more into it than this.
Have another think about the photo here and you should see I've added red dots. These dots have reached the points where the vertical and horizontal lines cross.
These are the real hot-spots of any photo, plus nude photography these are the points in which you should place your primary points of focus.
Applying this technique is a simple way to make sure half-decent results most likely. You will discover course other techniques that will be easily learn that may get superb shots quite often.
You will need time for you to learn these more complex techniques, but when you have a not much time and also take your nude photography further this amazing downloadable package offers you everything you need to know.
Use diagonal lines of composition
Another photography technique that work well well for nearly all types of photography is the by using diagonal lines within your compositions.
nude photography techniques - rule of thirds Using diagonal lines can really make a photo more punchy. It adds another portion of drama and impact on the image.
Inside photo here the model was positioned in order to develop a diagonal along the photo.
This creates an infinitely more dramatic shot than simply positioning the model prone.
Diagonals don't simply have to be produced by placing your model in a very diagonal. You might also use props within the scene to create the diagonal, as well as tilt the digital camera to create a distinct diagonal.
Breaking the rules
The foundations here will certainly buy your nude photos off the ground and may allow you to get half decent photos.
When you've established basic fundamentals and are ready to go it might be time and energy to break among those rules and in some cases add in extra dimensions.
For example, make use of lighting techniques to create shadows that fall as diagonals. You might play with horizontals and verticals. There's an abundance of ideas within this fabulous nude photography eBook.
Furthermore , it is sold with free audio lessons along with a helpful video should you wish to earn money from your photos. These bonuses alone make the package an outstanding investment in nude photography.